Installation Guide and Helpful Tips
Once you've purchased the profile, you can get up and running in 5 minutes. I've included the full walkthrough below if you want to dive in deeper.
5 Minute Installation - Start Here
1. Quit Loupedeck
If you have the Loupedeck app installed, you have to turn it off. CommandPost works independently of the Loupedeck Software.
Go to the menu item and select Stop Loupedeck or Quit, depending on which version of the app you have.
Don’t install CommandPost via the Loupedeck Marketplace.
2. Download and Install CommandPost
Download the latest CommandPost version and install it.
- Download page.
- Follow the instructions to give Mac OS permissions.
3. Install Final Cut Pro custom command set and effects
Some of the shortcut buttons in this template use keyboard shortcuts that you’ll need to add to your Final Cut Pro setup.
Keyboard command set:
In Final Cut Pro, click on ‘Final Cut Pro’ in the top left menu and then Command Sets -> Import. Select the Loupedeck CT - FCP Commands.commandset file included.
Custom effects:
Go to the 01 Install Files -> FCP Effects Presets and FCP Templates folders and follow the instructions to copy/paste them into the right folders in your Mac.
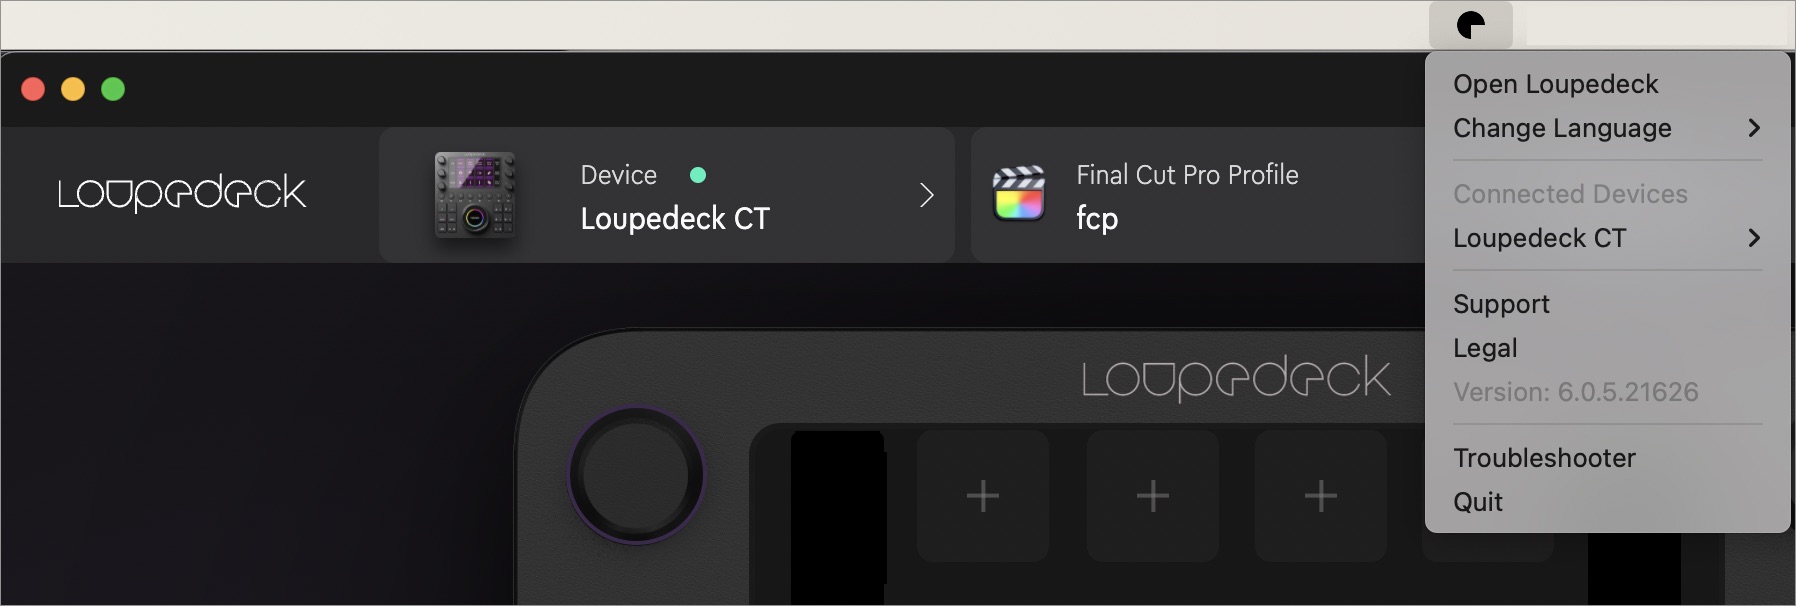
4. Import this template into CommandPost
Start CommandPost, go to the menu icon, select Control Surfaces -> Loupedeck CT. On this screen, select Final Cut Pro for the application, and click Import Settings.
In the popup import settings, select ‘Replace’ instead of ‘Merge’. Find the Loupedeck CT - Master FCP CommandPost Profile.cpLoupedeckCT file included and import it.
Make sure ‘Enable Loupedeck CT Support’ and ‘Automatically Switch Applications’ are toggled on.
That’s it!
Introduction and Walk Through
I’ve been using FCPX since the day it came out, and like many FCP users over time I’ve become pretty good at editing quickly without stumbling over keys or menu items.
But there are some actions that really slow me down, either because they require a combination of 3 or 4 hotkeys, or they require a lot of mousing around, or both. Maybe a whole new way of keying in edit commands is in the cards?
After looking at all the various hardware control surfaces, I settled on the Loupedeck CT because it appeared to offer the most versatility for a reasonable price.
Right from the start, I encountered the same problem that plagues every other FCP editor who went down this path: it’s really cool but it’s going to take forever to customize.
Other Final Cut Pro profiles for Loupedeck CT
The official Loupedeck software is very intuitive, but the customization for FCP is extremely limited. It’s more like adding another control surface to have to learn, in addition to the keyboard, rather than actually speeding up your workflow.
There are also icon packs with templates you can purchase, and I tried all of them, but now you have dozens and dozens of control banks that replicate literally every keyboard and menu command imaginable.
Although these icon packs are a start, pairing them down to just the useful tasks would take weeks or months of customization.
Example of Loupedeck’s FCP profile and third-party icon libraries
![]()
![]()
The Mission
Ultimately, I wanted to create a custom Loupedeck CT interface that did not just replicate every single FCP option on the planet. The goal is to create a hardware interface that utilizes the most essential commands, while speeding up the tasks that slow down every FCP editor.
The goal isn’t to replace the mouse or keyboard. It’s to create a blazing fast hardware interface for the most common FCP tasks that every editor uses.
Or at least the start of one. Where you can now customize the template to your own needs, without having to spend weeks learning how to setup your brand new Loupedeck CT.
To summarize, the mission of this master profile is to use the Loupedeck CT to speed up the FCP editing process, not to replace the keyboard and mouse setup for no reason.
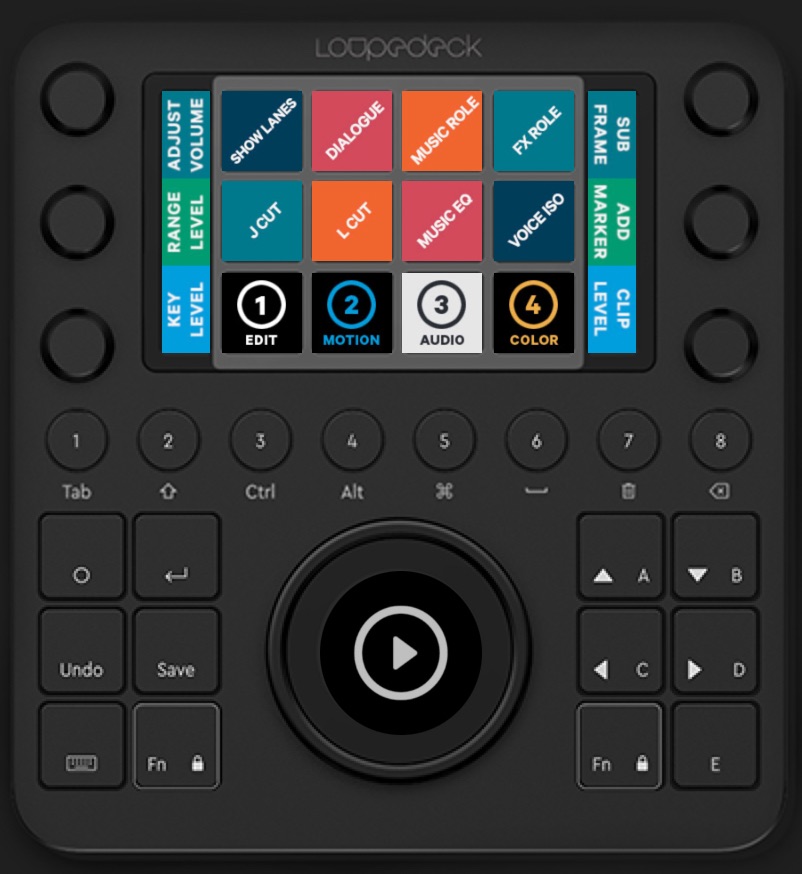
The End Product: 4 Banks of Shortcuts
After testing heavily for over a year and a half, and asking editor friends to give their feedback, I ended up with a 4 Bank system that shares the bottom controls among all the banks, while the top controls change based on whether you’re doing general edits, fine tuning audio, animating motion, or color grading.
For the shortcut icons, I chose to use a basic text system rather than visual icons, because during testing I found I could recognize text much quicker than fancy icons.
![]()
Let’s Walk Through all the Banks and Buttons
Let’s go through each bank in the master profile and explain what each button does.
Note: there are PSD templates included for you to customize all of these shortcuts and banks as you like. My hope is this profile lets you breeze past the months of initial setup so you can fine tune your Loupedeck CT profile in a way that helps you edit much more quickly.
Global Controls
The bottom half of the Loupedeck CT has global shortcuts among all the banks. I found this is the best way to simplify this tool so that it works for you, something you can do with your eyes closed, rather than become another menu to memorize.
The only exception is the color grading bank, where the jog wheel is used for exposure and saturation adjustments.
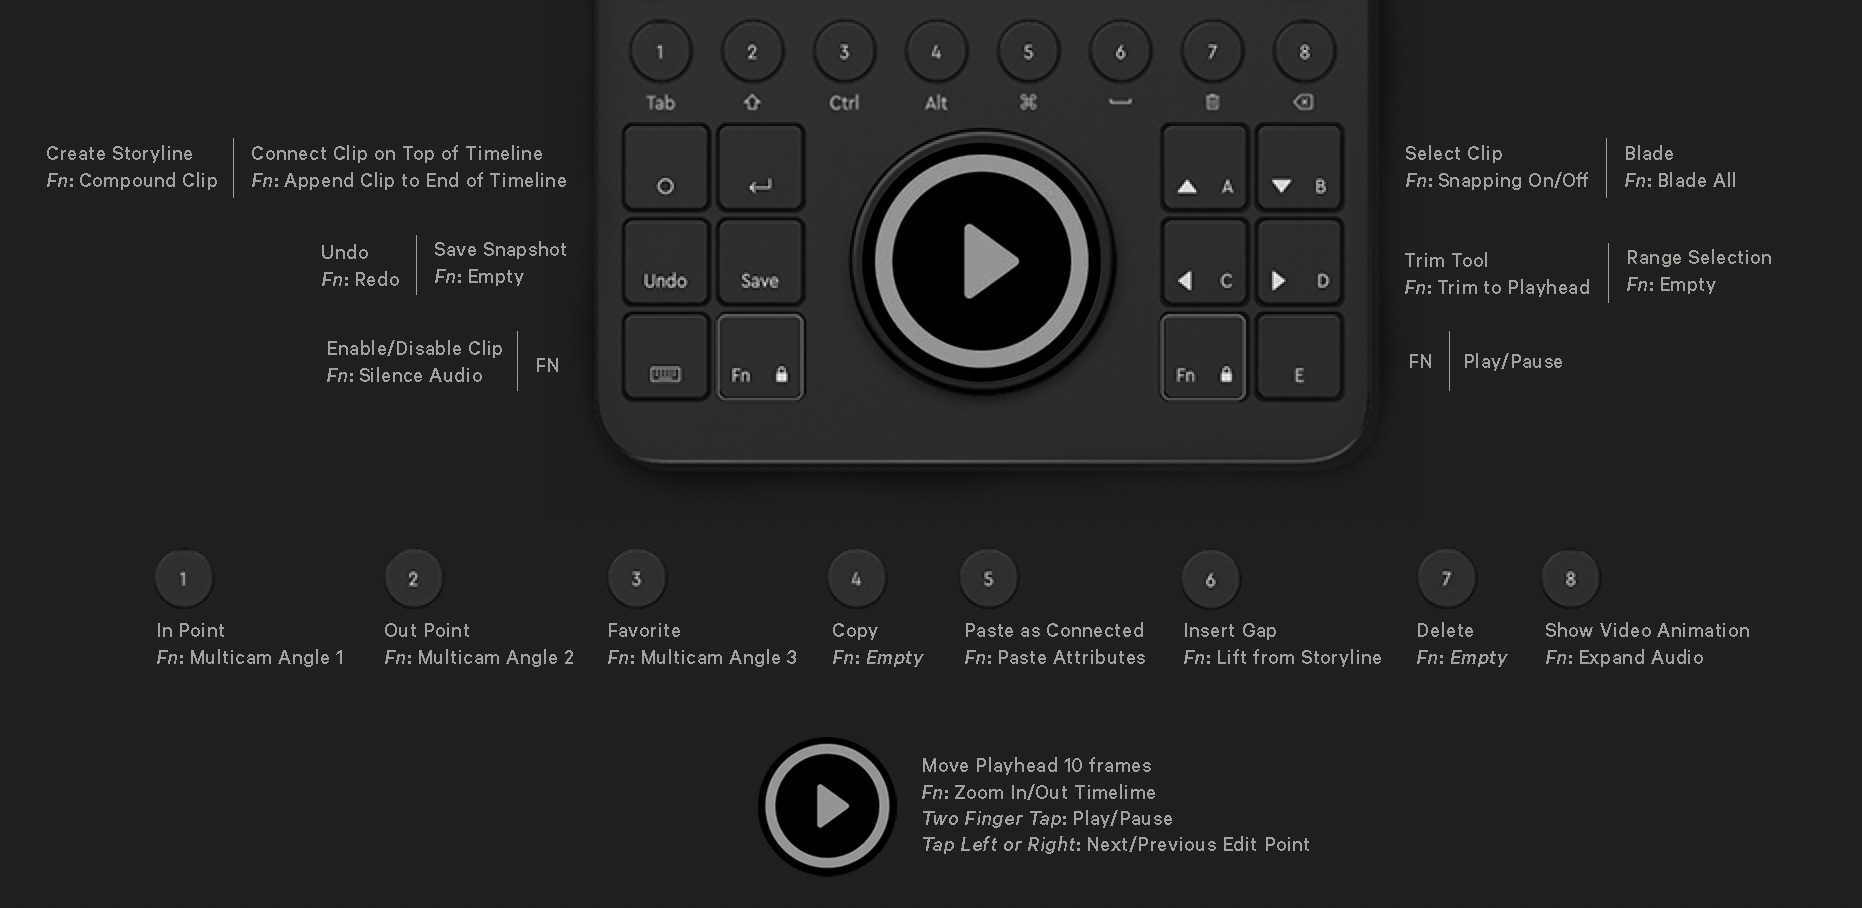
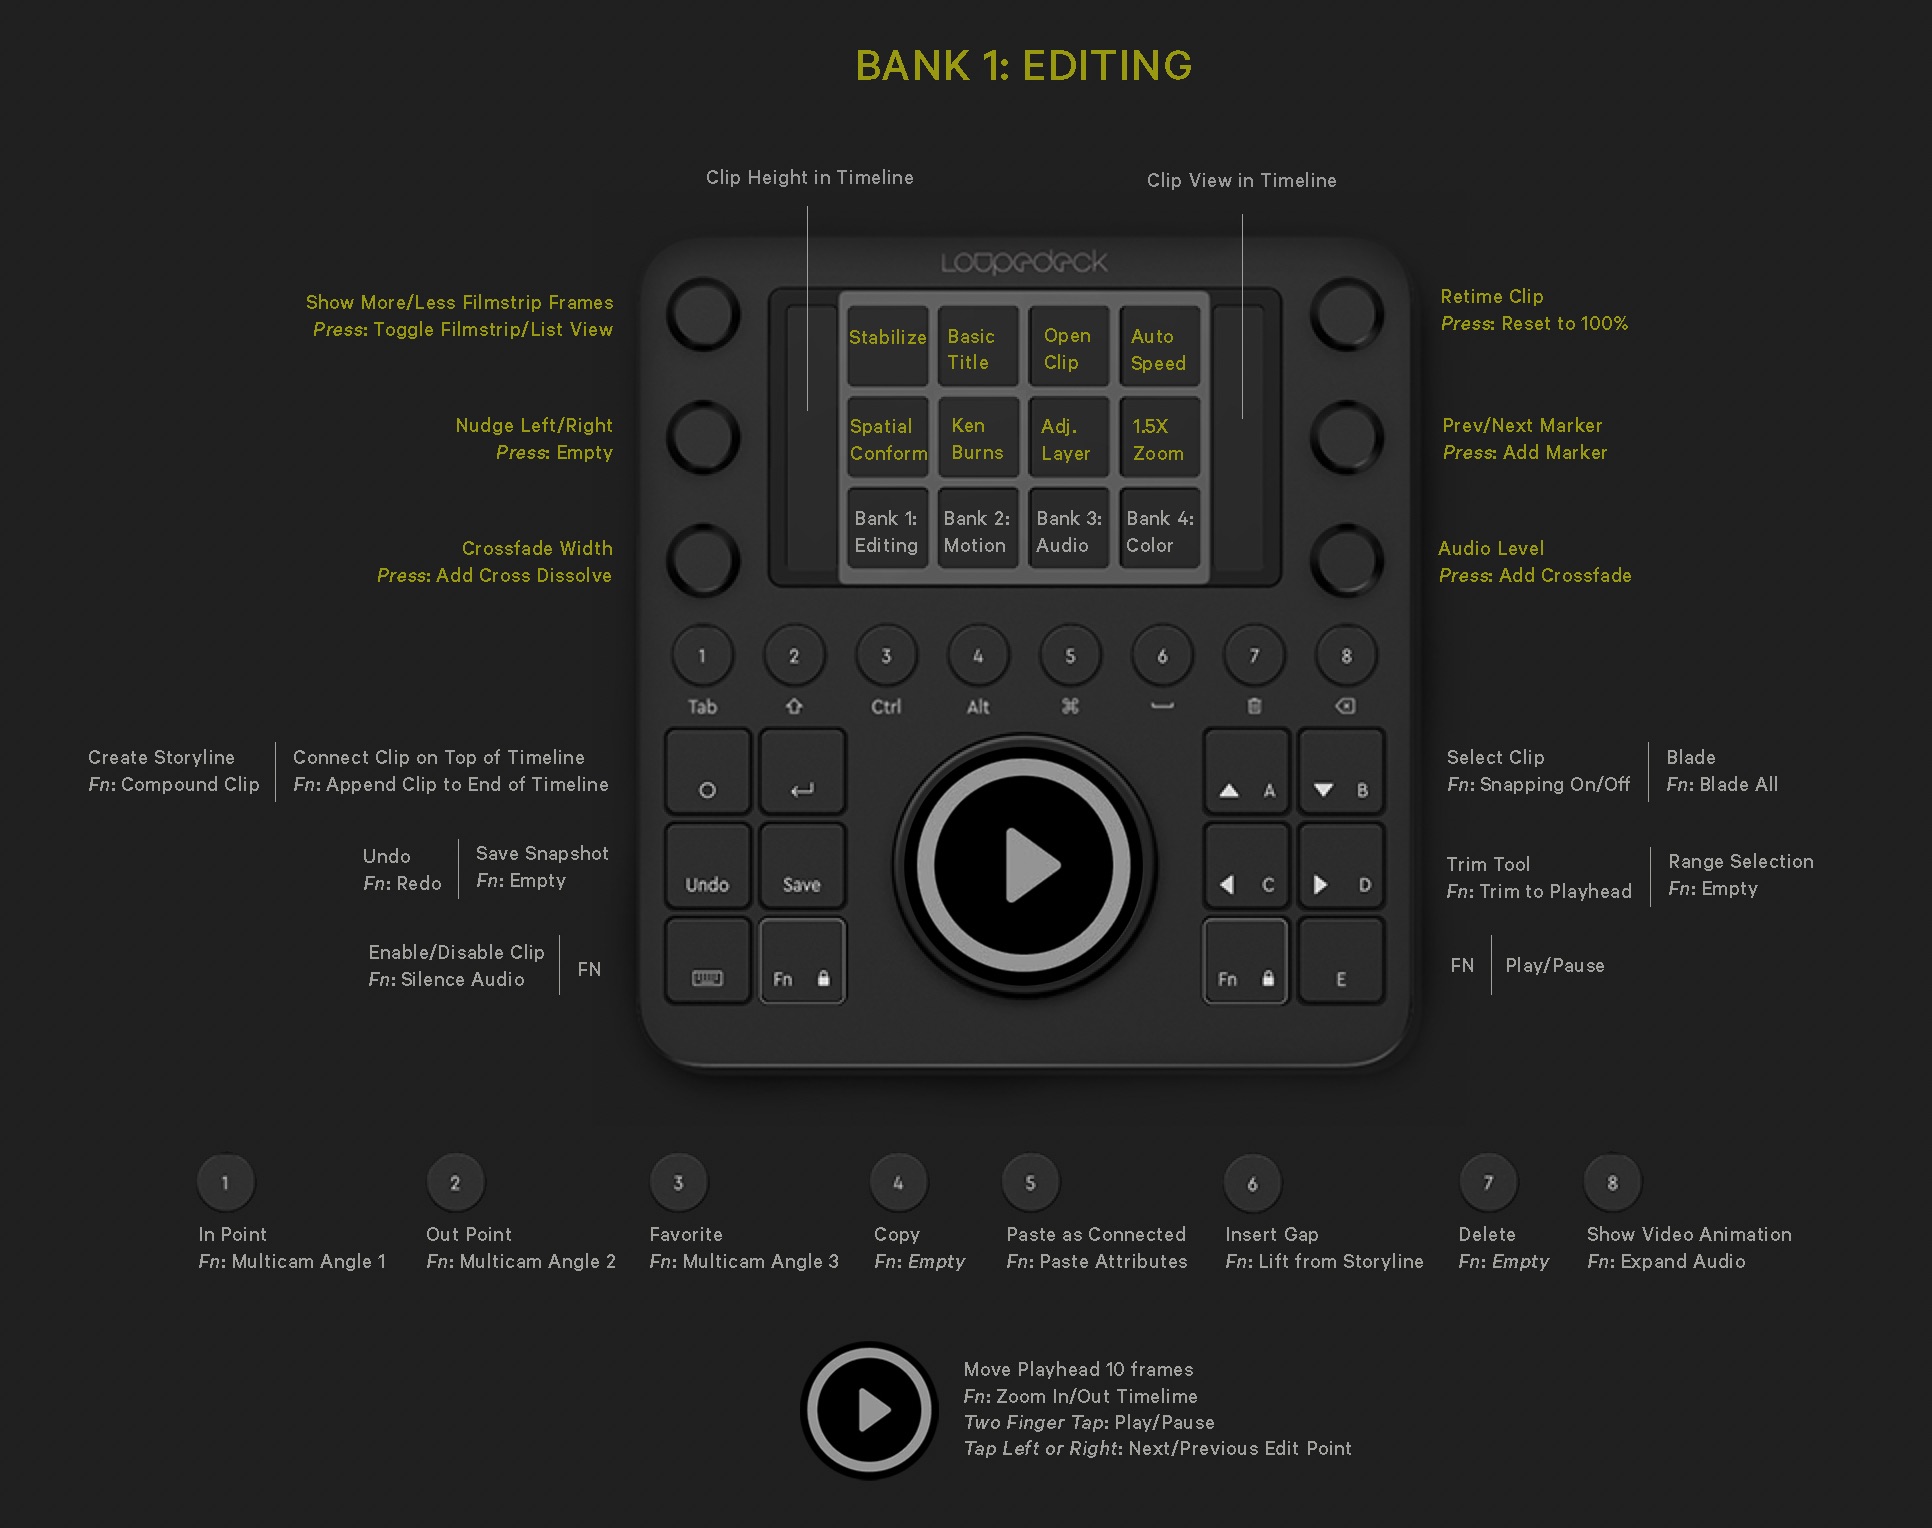
Main Jogwheel
Rotate left or right
Moves the playhead 10 frames forward or backward.
Press and hold Left or Right Fn while rotating
Zoom in or out of the timeline.
Two finger tap: Play/Pause
Tap left or right: Next/Previous Edit Point.
Left and Right Side Screens
The area between the knobs and the buttons are global for all banks. You can just drag your finger up and down over these icons.
Left Side Screen
Slide Up/Down action changes the clip height in the timeline
Right Side Screen
Slide Up/Down action changes the clip appearance in the timeline
Center Controls
1
In Point
Left Fn: Multicam Angle 1
2
Out Point
Left Fn: Multicam Angle 2
3
Favorite
Left Fn: Multicam Angle 3
4
Copy
Fn: Empty
5
Paste as Connected Clip
Right Fn: Paste Attributes
6
Insert Gap
Right Fn: Lift from Storyline
7
Delete
Fn: Empty
8
Show Video Animation
Right Fn: Expand Audio
Bottom Left Controls
O
Create Storyline
Left Fn: Create Compound Clip
⏎
Connect Clip on Top of Timeline
Left Fn: Append Clip to End of Timeline
Undo
Undo
Left Fn: Redo
Save
Save Snapshot
Left Fn: Empty
Keyboard Icon
Enable/Disable Clip
Left Fn: Silence Audio
Fn
Press and hold this to enable the Fn secondary function with most buttons
Bottom Right Controls
▲A
Select Clip
Right Fn: Snapping On/Off
▼B
Blade
Right Fn: Blade All (vertically across all clips at playhead)
◄C
Trim Tool
Right Fn: Trim to Playhead
►D
Range Selection
Right Fn: Empty
Fn
Press and hold this to enable the Fn secondary function with most buttons
E
Play/Pause (I prefer this much more than using the jogwheel, as it’s very easy to rest your thumb here to play/pause)
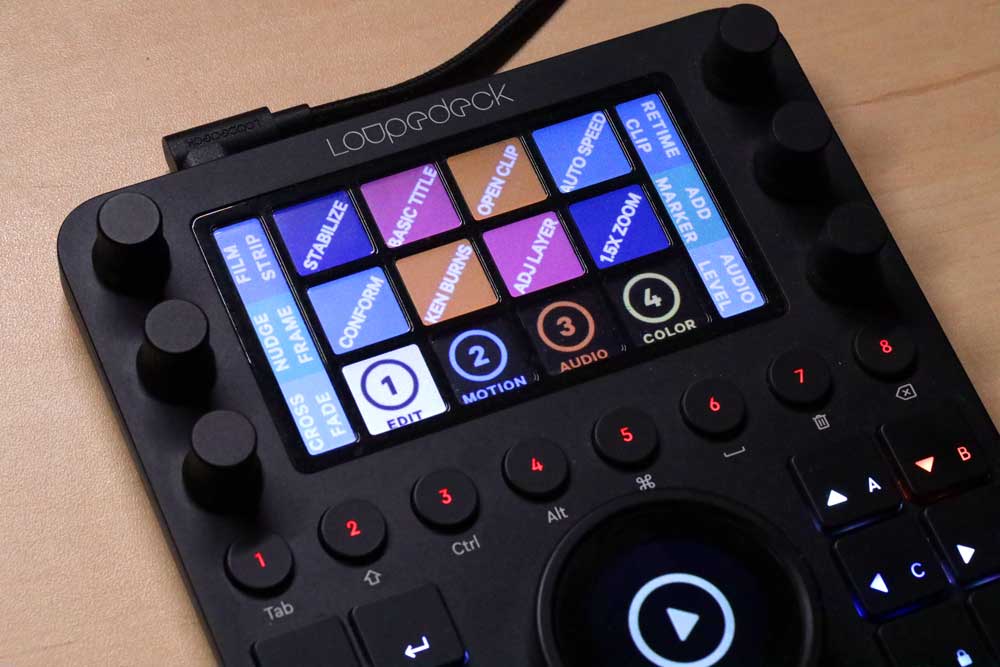
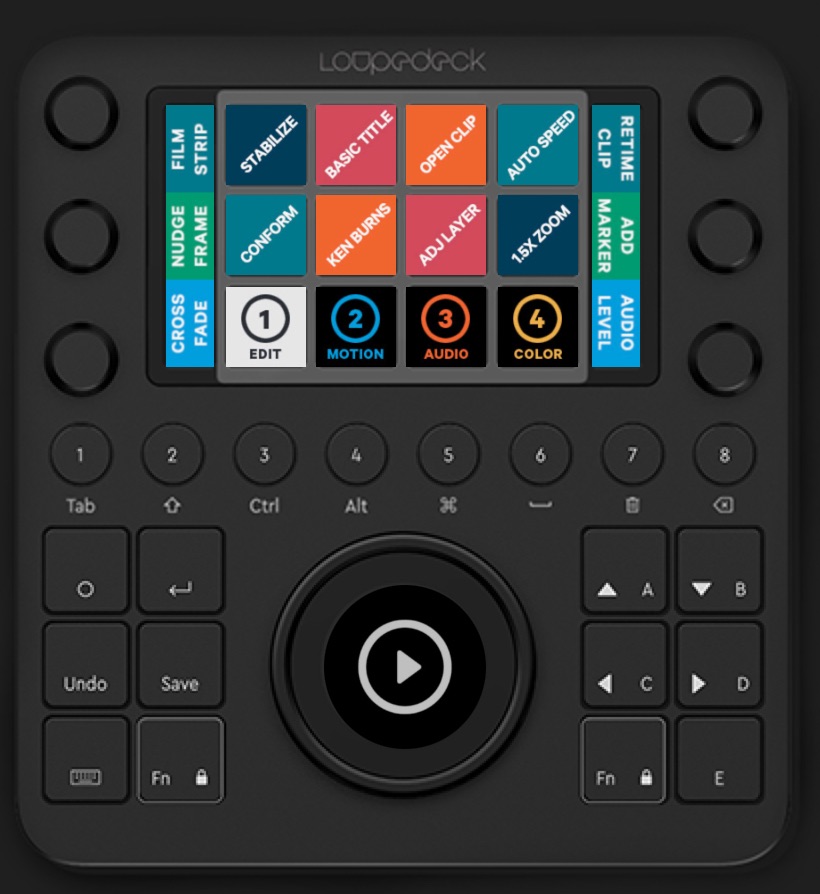
Bank 1 - Editing
![]()
Bank 1 Knobs
Top left knob
Show More/Less Filmstrip Frames
Press: Toggle Filmstrip/List View
Mid left knob
Nudge Left/Right Press: Empty
Bottom left knob
Cross Dissolve Width/Duration Press: Add Cross Dissolve
Top right knob
Retime Clip
Press: Reset to 100%
Mid right knob
Prev/Next Marker Press: Add Marker
Bottom right knob
Audio level Press: Add Crossfade
Bank 1 Buttons
Stabilize
Applies a stabilize on the selected clip
Basic Title
Adds a basic title to the timeline
Open Clip
Executes the 'Open Clip' function
Auto Speed
Conforms a clip to the project's framerate
Spatial Conform
Stretches out the clip to fit the frame
Ken Burns
Applies a Ken Burns crop with one button
Adj. Layer
Adds an adjustment layer to the timeline
1.5X Zoom
Applies a 1.5X zoom for a quick jump cut
Bank 2 - Motion
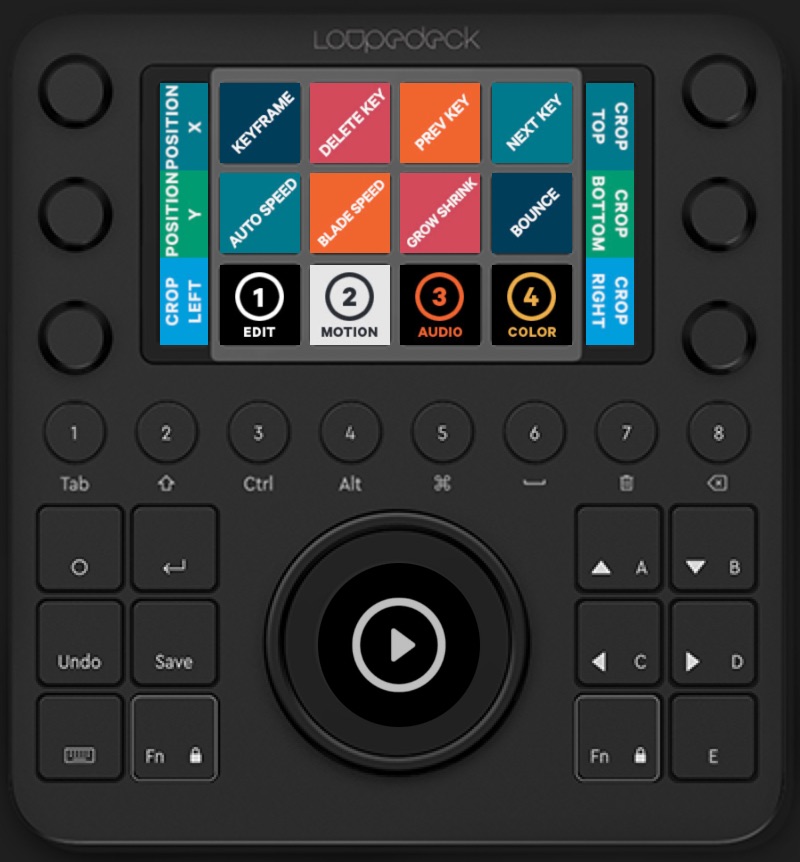
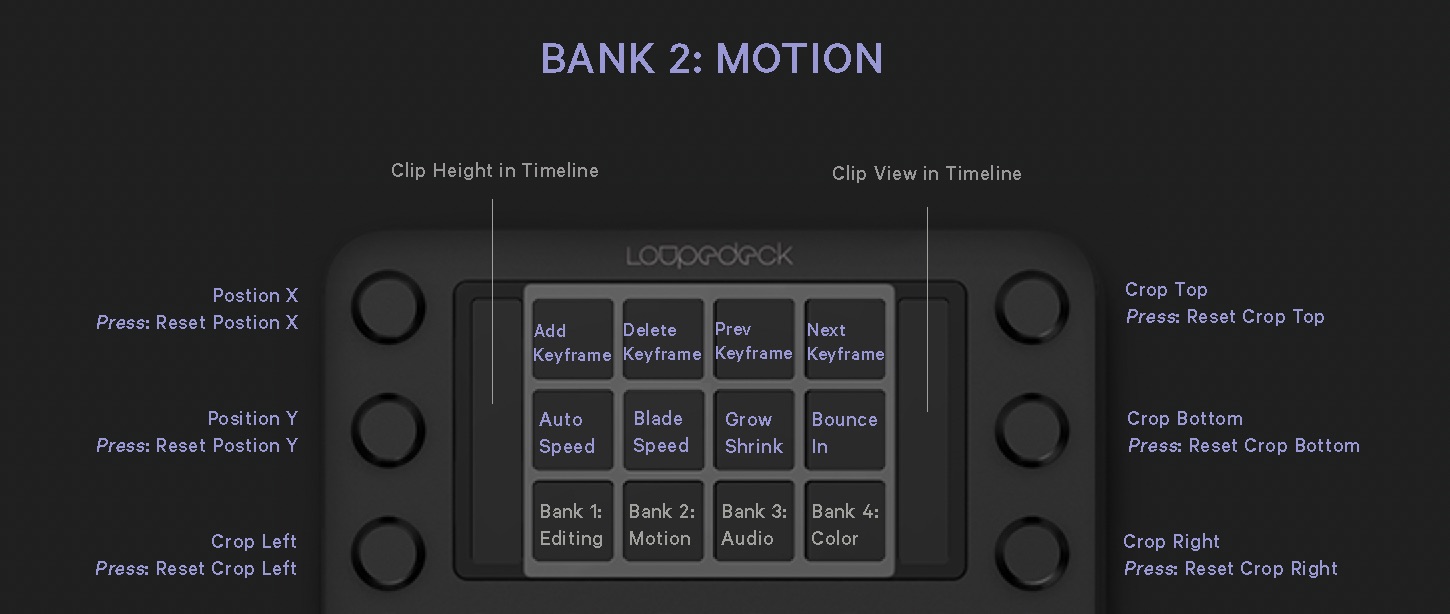
Bank 2 Knobs
Top left knob
Position X Press: Reset Position X
Mid left knob
Crop Top Press: Reset Crop Top
Bottom left knob
Crop Left Press: Reset Crop Left
Top right knob
Position Y
Press: Reset Position Y
Mid right knob
Crop Bottom Press: Reset Crop Bottom
Bottom right knob
Crop Right Press: Reset Crop Right
Bank 2 Buttons
Add Keyframe
Adds a keyframe to the clip
Delete Keyframe
Deletes keyframe
Prev Keyframe
Selects the previous keyframe in the clip
Next Keyframe
Selects the next keyframe in the clip
Auto Speed
Conforms a clip to the project’s framerate (this is a duplicate button from Bank 1 but I thought it was important in the Motion bank as well)
Blade Speed
Quick way to change the ramp up/down speed of a clip
Grow Shrink
Applies the Alex4D Grow Shrink plugin for adding quick motion to any clip
Bounce In
Applies a bounce-in effect on a clip
Bank 3 - Audio
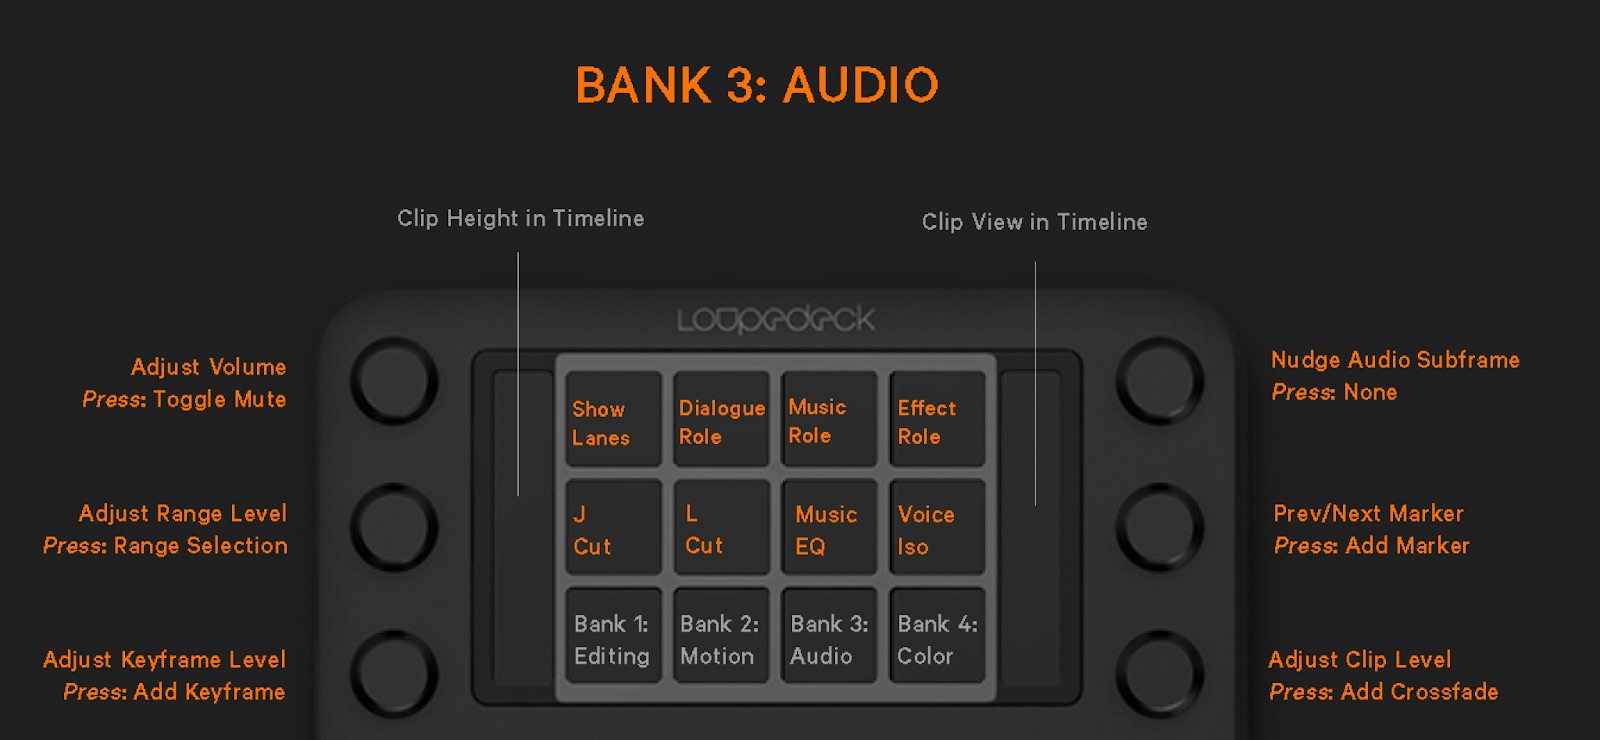
Bank 3 Knobs
Top left knob
Adjust Volume
Press: Toggle Mute
Mid left knob
Adjust Range Level
Press: Range Selection
Bottom left knob
Adjust Keyframe Level Press: Reset Crop Left
Top right knob
Nudge Audio Subframe
Press: None
Mid right knob
Prev/Next Marker Press: Add Marker
Bottom right knob
Adjust Clip Level Press: Add Crossfade
Bank 3 Buttons
Show Lanes
Shows/Hides the role lanes
Dialogue Role
Sets current clip as a Dialogue Role
Music Role
Sets current clip as a Music Role
Effect Role
Sets current clip as an Effect Role
J Cut
Creates a J cut between two clips
L Cut
Creates an L cut between two clips
Music EQ
Applies Fat EQ and a custom music reduction EQ preset to let voices through better
Voice Iso
Applies a Voice Isolation effect on the current clip
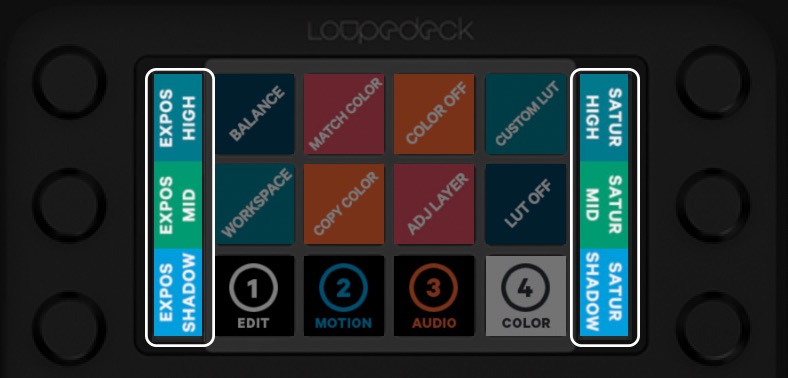
Bank 4 - Color Board
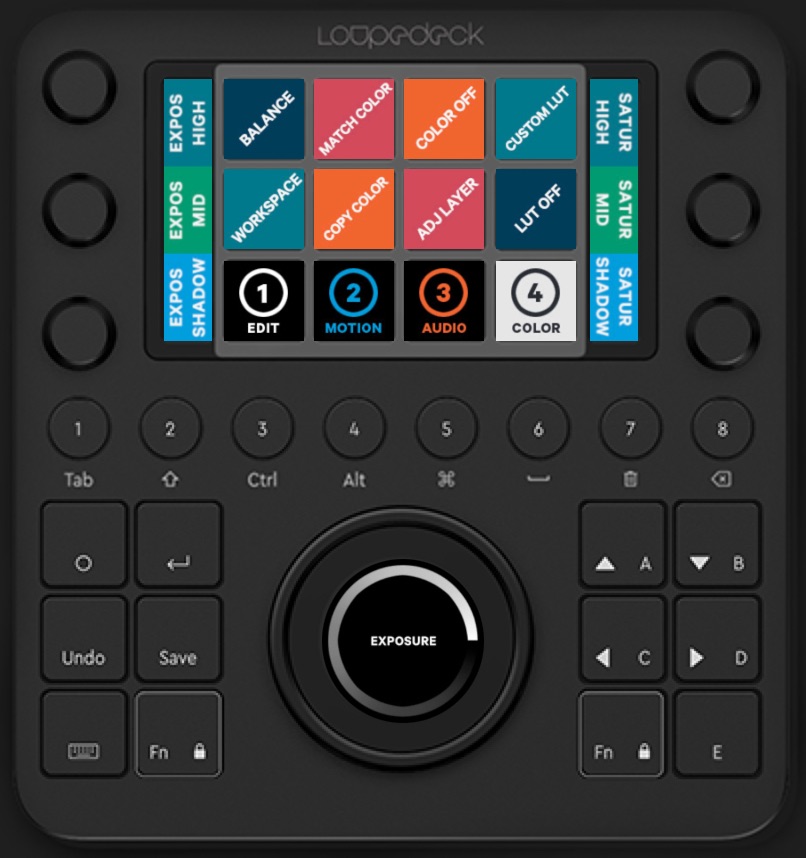
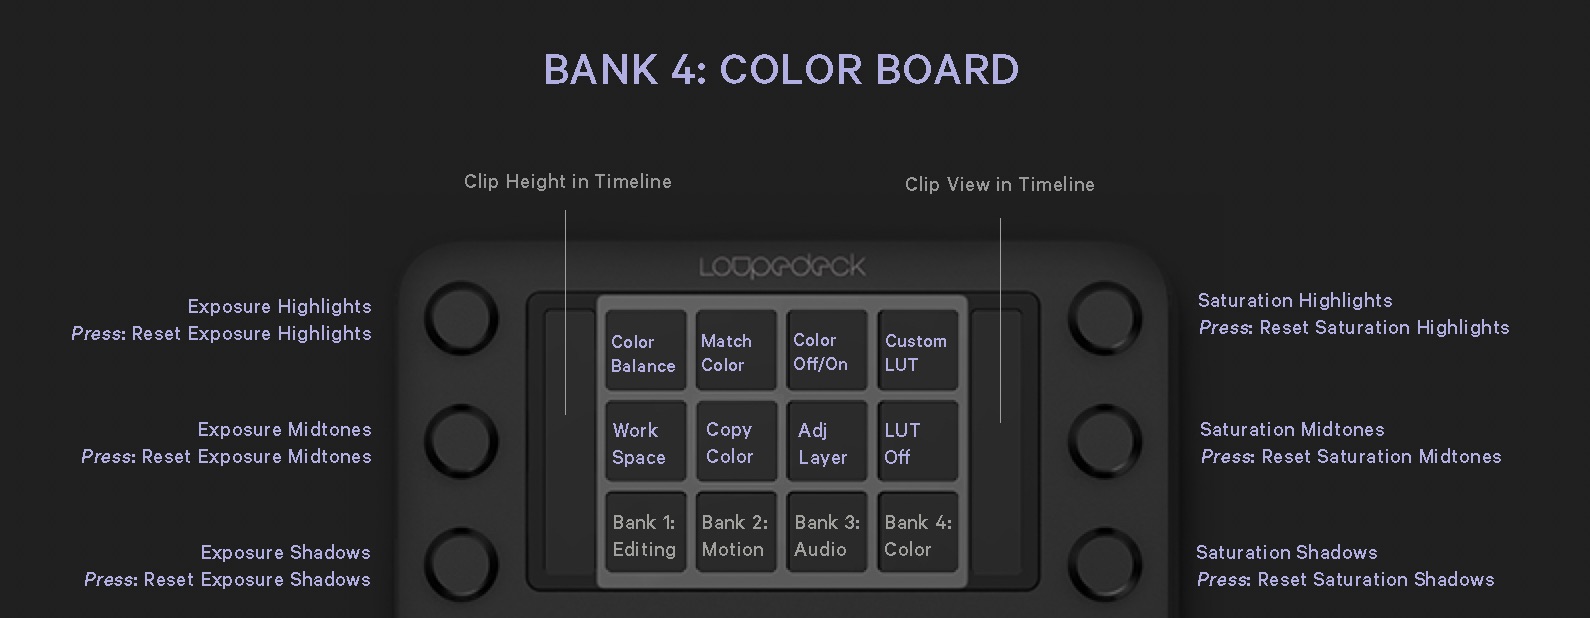
Bank 4 Knobs
Jogwheel
Adjusts the exposure master
Fn Left/Right with Jogwheel
Adjusts the saturation master
Top left knob
Exposure Highlights
Press: Reset Exposure Highlights
Mid left knob
Exposure Midtones
Press: Reset Exposure Midtones
Bottom left knob
Exposure Shadows Press: Reset Exposure Shadows
Top right knob
Saturation Highlights
Press: Reset Saturation Highlights
Mid right knob
Saturation Midtones Press: Reset Saturation Midtones
Bottom right knob
Saturation Shadows Press: Reset Saturation Shadows
Bank 4 Buttons
Color Balance
Applies FCP’s Color Balance
Match Color
Initiates Match Color
Broadcast
Adds the Broadcast Safe filter
Custom LUT
Applies the Custom LUT effect
Workspace
Switches to FCP’s Color and Effects workspace Fn Right: Default workspace
Copy Color
Paste’s the previous clip’s color settings to current clip
Adj Layer
Adds an adjustment layer
LUT Off
Turns off the default camera LUT setting
Bank 5 - Color Wheel
You can choose to use either the Color Board or the Color Wheel for your Bank 4 Shortcut on the Loupedeck CT. In CommandPost they are created as Bank 4 and Bank 5. Detailed instructions are included further in this guide.
![]()
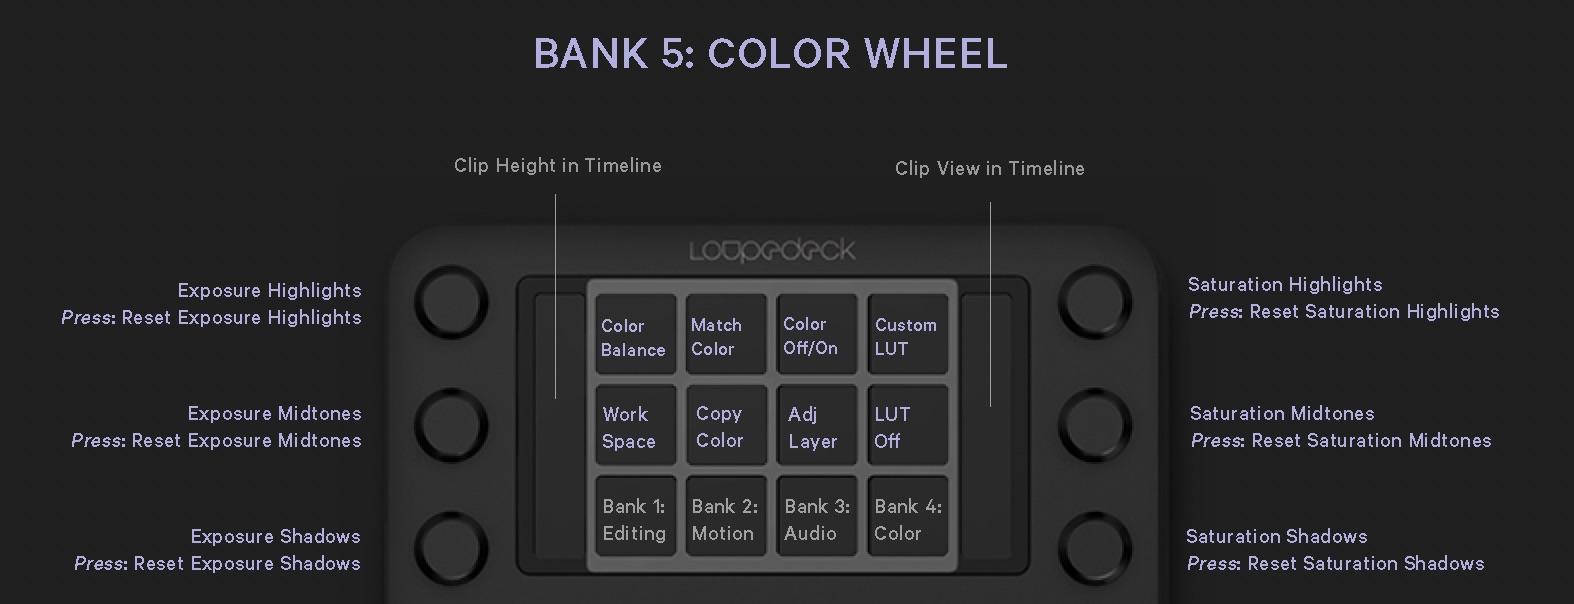
Bank 5 Knobs
Jogwheel
Adjusts the exposure master
Fn Left with Jogwheel
Adjusts the temperature master
Fn Right with Jogwheel
Adjusts the saturation master
Top left knob
Exposure Highlights
Press: Reset Exposure Highlights
Mid left knob
Exposure Midtones
Press: Reset Exposure Midtones
Bottom left knob
Exposure Shadows Press: Reset Exposure Shadows
Top right knob
Saturation Highlights
Press: Reset Saturation Highlights
Mid right knob
Saturation Midtones Press: Reset Saturation Midtones
Bottom right knob
Saturation Shadows Press: Reset Saturation Shadows
Bank 4 Buttons
Color Balance
Applies FCP’s Color Balance
Match Color
Initiates Match Color
Broadcast
Adds the Broadcast Safe filter
Custom LUT
Applies the Custom LUT effect
Workspace
Switches to FCP’s Color and Effects workspace Fn Right: Default workspace
Copy Color
Paste’s the previous clip’s color settings to current clip
Adj Layer
Adds an adjustment layer
LUT Off
Turns off the default camera LUT setting
Installation Details
The current version of this profile has been tested on Final Cut Pro 11.0.1, Loupedeck 6.05 app, CommandPost 1.5.2, on a Mac Studio M2 running Sonoma 14.6.
No matter what version of the Loupedeck app you’re using, you must quit/stop the Loupedeck app while running this profile in CommandPost.
CommandPost
CommandPost is a free, open-source MacOS app developed by Chris Hocking and David Peterson. It is a feature-rich program with unlimited options for customizing FCP, utilizing many different control surfaces. Which also makes it a little intimidating for the first time Loupedeck CT user. This guide will make everything clear for you.
If you find this whole Loupedeck CT profile useful, please donate to support CommandPost and the thousands of hours they’ve dedicated to developing this software.
Download the latest CommandPost version
Follow the instructions to give Mac OS permissions.
Open up CommandPost, click on the top menu icon and then Control Surfaces, and then select Loupedeck CT. Make sure Final Cut Pro is selected as the application.
Now click Import Settings, and import the profile from the 01 INSTALL FILES folder: Loupedeck CT - Master FCP CommandPost Profile.cpLoupedeckCT. Click Replace, not Merge.
FCP Effects Presets
I’ve made a few effects presets that are used in this Loupedeck CT profile. To install them you only need to copy and paste them into your Users -> yourusername -> Library -> Application Support -> ProApps -> Effects Presets folder.
In Finder, click on Go, and then Go to Folder, and paste this: ~/Library/Application Support/ProApps/Effects Presets
1.5X Preset
This scales the clip 1.5X for a quick jump cut
Music Reduce
This Fat EQ effect preset can be applied to any music bed to reduce the levels where the human voice can better be heard.
Voice Isolation
An effects preset to toggle the default Final Cut Pro Voice Isolation effect, which after testing I’ve found to work as good or better than third party plugins for reducing the room space for interview audio.
FCP Effects
There are a few custom effects that are used in this Loupedeck CT profile.
Alex4D Grow/Shrink
This is a free plugin which is also available here. To install it you just copy the folder into your Movies -> Motion Templates -> Effects folder.
It’s a handy plugin to give slight motion to any clip. Alex4D plugins are amazing.
Bounce In
I made this plugin in Motion to provide a basic bounce in effect for text. To install it, copy the folder into your Movies -> Motion Templates -> Transitions folder.
If you want a more refined bounce animation, I highly recommend this plugin: Bounce Pop Up Effects FCPX
YAAL (Yet Another Adjustment Layer)
I made this free adjustment layer, but you’re welcome to use any of the other free versions out there. Just copy this folder into your Movies -> Motion Templates -> Titles folder.
FCP Keyboard Command Set
Some of the shortcut buttons in this profile use keyboard shortcuts that you’ll need to add to your Final Cut Pro setup.
In Final Cut Pro, click on ‘Final Cut Pro’ in the top left menu and then Command Sets -> Import. Select the Loupedeck CT - FCP Commands.commandset file included.
General Tips as you move around CommandPost
Here are some tips that I’ve picked up while using Loupedeck CT with Final Cut Pro. Hopefully this can get you past the initial learning curve when working with CommandPost.

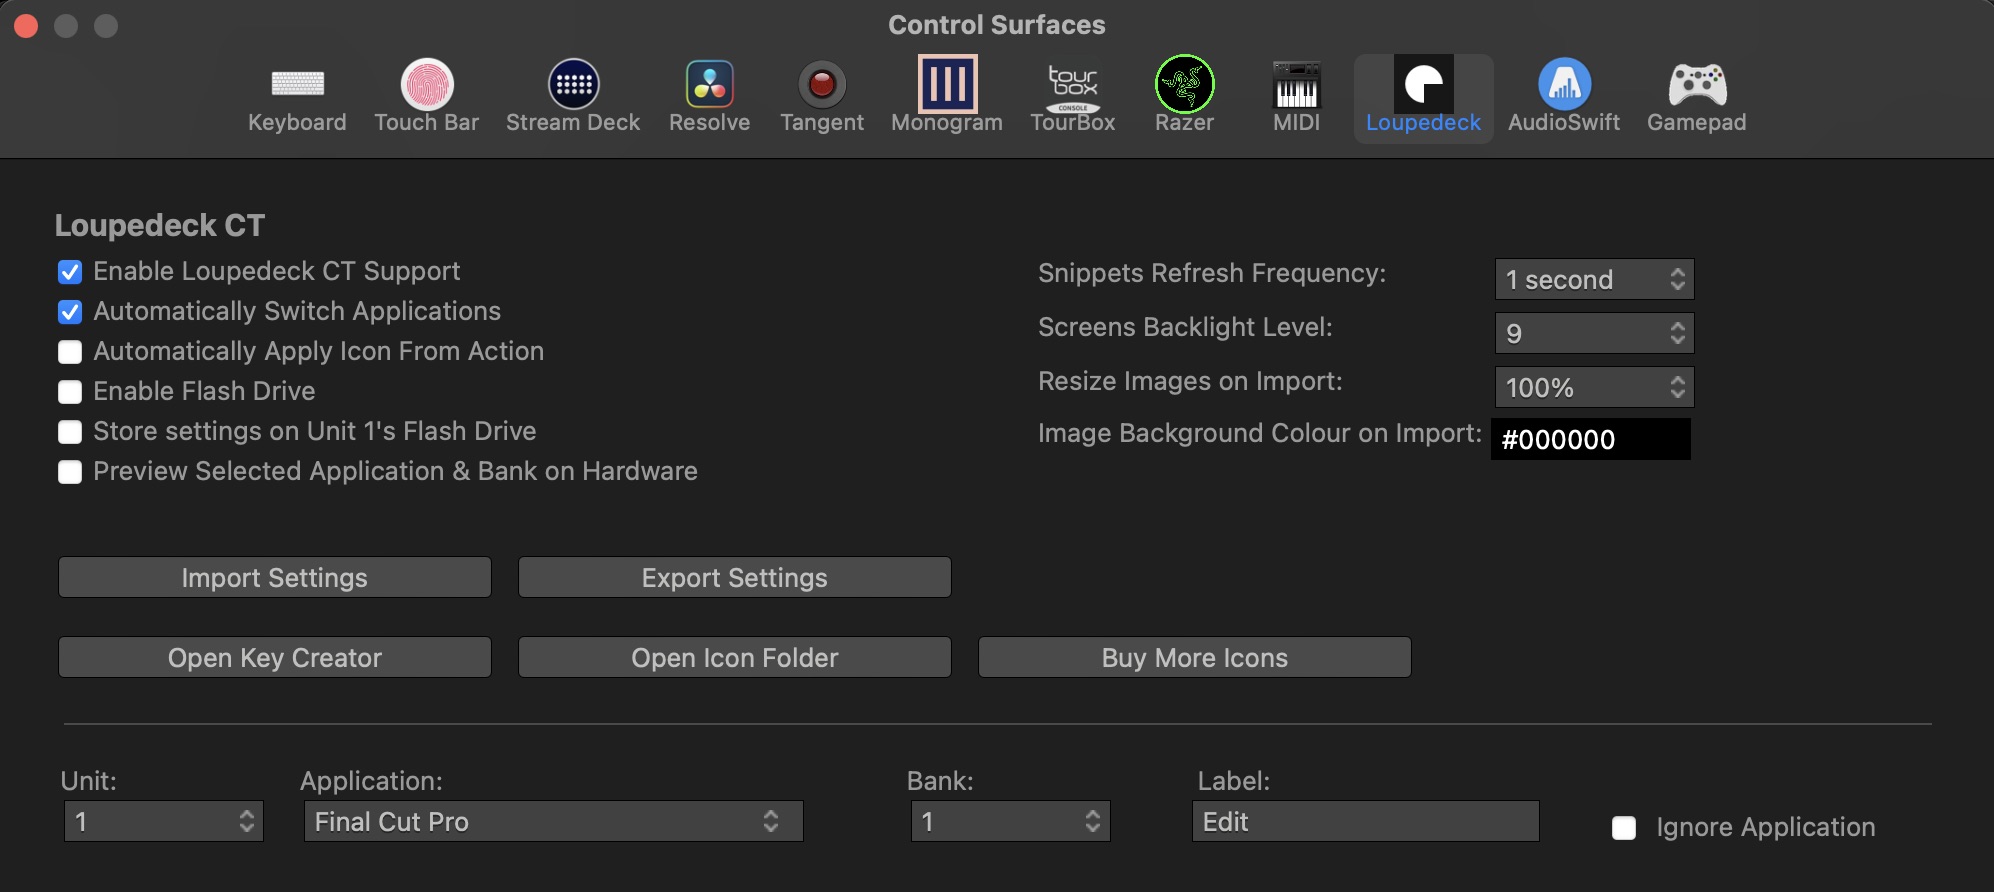
At the very top, these are all the control surfaces that CommandPost works with currently. You only need to focus on Loupedeck.
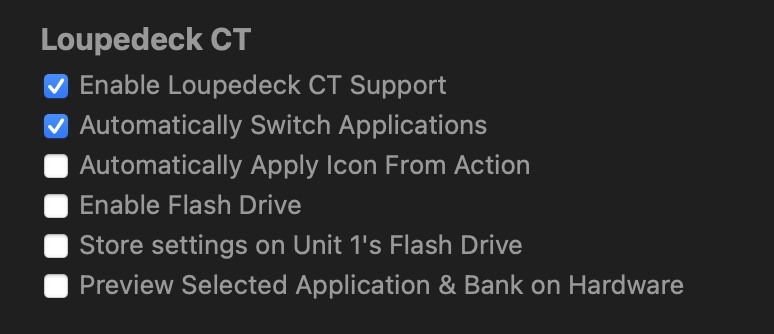
In the main settings, you need to Enable Loupedeck CT Support. You also want to select Automatically Switch Applications if you want your Loupedeck to recognize when you’re in Final Cut Pro.
If you’re working on customizing your banks and want to keep your Final Cut Pro settings active on your Loupedeck even if you’re using other apps, select Preview Selected Application & Bank on Hardware. It’ll prevent automatic switching.
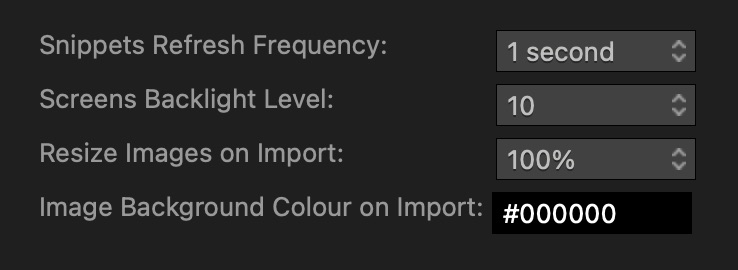
The Screens Backlight Level is your preference. Resize Images on Import applies to the custom icons for buttons. If you select something smaller than 100%, CommandPost will automatically make the icons smaller and apply the “Image Background Color” as a border around the icon.

This is where you’ll import the settings for this template. If you make customizations, it’s a good idea to Export Settings and save them somewhere in case something goes wrong.

Here is where you’ll select your Unit (which in this case we only have one Loupedeck CT), Application (Final Cut Pro), and the Bank along with the Label for that bank.
In our case we have 5 banks: 1: Edit, 2: Motion, 3: Audio, 4: Color Board, and 5: Color Wheel. As mentioned earlier, you can select either Color Board or Color Wheel as your default for Button 4 on your Loupedeck CT.
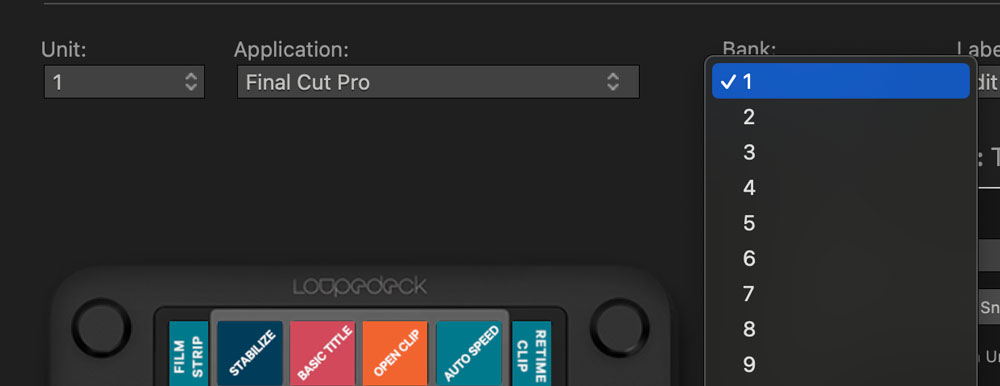
Within each bank, we can also choose the bank (Left Fn) or bank (Right Fn), which gives us options to customize all the Loupedeck CT buttons when we press and hold down the left or right Fn keys.
There’s a LOT of units and banks here, with a ton of room for customization, but we don’t need 95% of them. The goal is to speed up our editing with essential hardware shortcuts, rather than recreate the entire Final Cut Pro UI within Loupedeck CT.
Button Settings in CommandPost
When editing buttons, you only need to select the Press Action. You don’t need to have a Release Action.
When editing control knobs, you have the Press Action, Turn Left Action, and Turn Right Action.
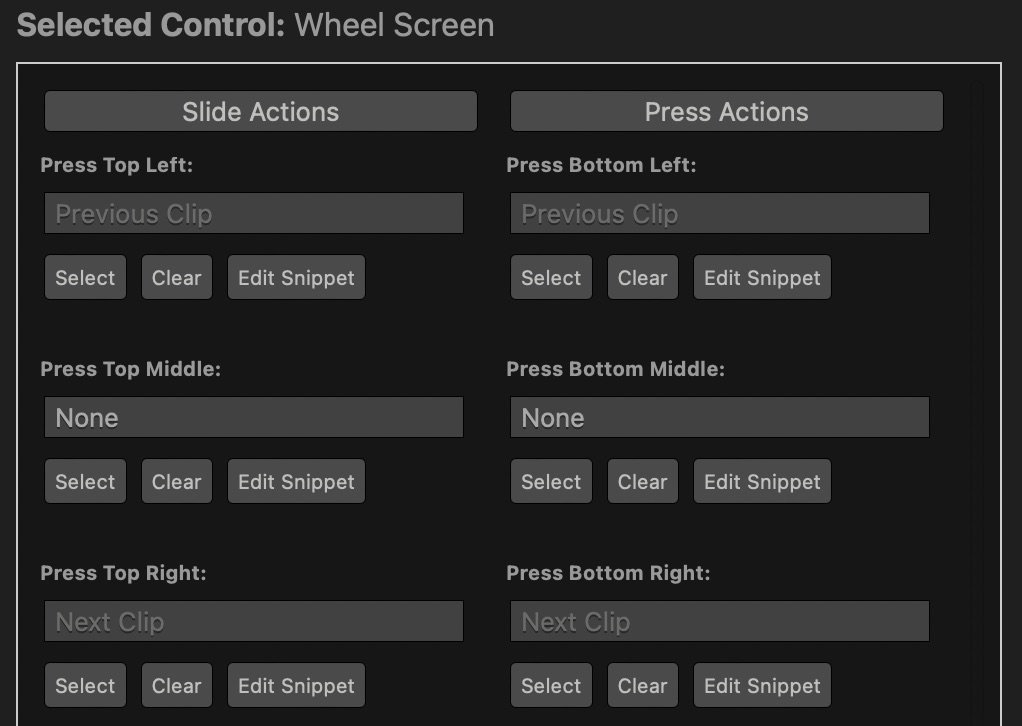
When editing the big jog wheel, if you click on the outside of the wheel image, you control the Turn Left Action and the Turn Right Action. If you click on the inside of the wheel image, and then click “Slide Actions”, you can control the Double Tap and Two Finger Tap. If you click on “Press Actions”, you can control the Press actions for the Top Left, Top Right, Bottom Left, and Bottom Right of the jog wheel.
Also keep in mind that for each button, including the main jog wheel, you can set completely different actions by going into the Left or Right Fn bank for that particular bank.
There is way more to CommandPost than this screen, with lots of customization for your particular Final Cut Pro settings. You can reach those settings by clicking on the icon in your menu bar, and then going to Preferences.
So feel free to play around and see just what you can customize in your Final Cut Pro workspace. But know that for using your Loupedeck CT, you don’t need to use anything except the Control Surfaces -> Loupedeck CT section.
Bank and Icon Templates
If you make additional changes to this FCP profile, I’ve included Photoshop templates for both the icons and the bank shortcut images.
The 02 SHORTCUT TEMPLATES folder contains the 5 bank shortcut images.
The 03 ICON TEMPLATES folder contains all the icon images as well as the templates for creating your own icons.
Can you use CommandPost with the official Loupedeck app?
You do not need to install the official Loupedeck software to use Loupedeck CT with CommandPost. However, if you choose to use the official Loupedeck software for other apps, you can still use CommandPost. Make sure to stop/exit the Loupedeck app before starting up CommandPost.
You could also use the official Loupedeck software and install CommandPost as a “marketplace plugin” within the Loupedeck app, but I don't recommend it.
Questions/Suggestions?
If you're already using this profile or you have some questions before you install it, reach out and I'll try to respond quickly. Thanks!